Installation Instructions
The material
The material is woven vinyl flooring backed with glass- fibre-reinforced vinyl.
Since the material is a woven product, its structure is naturally irregular.
The material is not approved for wet rooms.
Requirements
The sub-floor must be clean, dry and free from cracks. Any adhesion-impairing spots of paint, oil, etc. and any dust should be removed. Please
note that asphalt, spil- lages of oil, impregnating agents and felt pen markings can cause discoloration.
Necessary damp-proofing must be in place to prevent harmful moisture coming into contact with the flooring. Follow national rules and
regulations with regard to moisture in floor structures. In the absence of such rules and regulations, use the following as guidelines.
When laying this product, the RH in any sub-floor of normal structural concrete must not exceed 85 %. This value only applies to construction
moisture. Measuring must always be performed by specially trained person- nel.
Sub-floors of sheet material are assumed to contain an 8 % moisture ratio (which corresponds to 40 % RH at
+20°C), so that no movement occurs that may subsequently cause damage.
In the event of any piping in floors, pipes must be laid so that the flooring material is not continuously exposed to temperatures higher than
30°C, as otherwise discoloration and other changes to the material can occur. This also applies to areas with underfloor heating.
Preparations
Carefully remove all dust and loose particles.
When using leveling compound, it is important to achieve the necessary strength and evenness.
Highly or unevenly absorbent sub-floors should be pre- glued with diluted floor adhesive (1:4). The pre-glued layer must be completely dry
before commencing laying. Installation on an existing plastic covering is not recom- mended. With painted sub–floors, there is a risk of disco-
loration. Existing paint must be removed.
Use pencil for any markings. Use material from the same production batch.
Take into account incoming light and high-traffic areas when installing. Avoid joints across the material. The lengths must be laid in the same
direction (see arrow on reverse).
Before installation, material, adhesive and sub-floor must be allowed to adjust to room temperature, i.e. a temperature of at least +18°C. The
relative air humidity must be 30-60 %. Higher levels of air humidity result in longer drying times and a risk of blistering.
Installation
Installation should take place at a room temperature of at least +18°C. The relative air humidity in the premises must be 30-60%. Higher levels
of air humidity result in longer drying times and a risk of blistering.
Use adhesives designed for vinyl flooring.
Normal consumption is around 4m2/liter of adhesive for absorbent sub-floors and around 5m2/liter for non-ab- sorbent sub-floors.
Always employ sticky adhesive, even for absorbent sub- floors. This is to avoid bubbles due to the flooring being stiff and not adhering firmly
to the adhesive if it is wet- glued. Be careful to ensure that the entire floor covering is in contact with the adhesive by using a heavy roller
or similar.
Installation time depends on various things, including type of sub-floor, absorption capacity of sub-floor, temperature and humidity of the air
in the room.
Important!
The lengths are overlapped by approx. 4 cm and then double-cut in order to achieve a tight seam. Mark the location of the seam to facilitate the
next stage.
See figures 1 and 2.
Welding
The seams must always be chemically welded. Use chemical welding fluid TYPE A from Werner Müller or TYPE F from CeGe Floor with a pointed needle
to get down into the seam. A welded seam has much greater strength, and you avoid future dirt accumulation in the seam. See figure 3.
- Adhesive residues in the seam must be avoided since it will make the seam more visible and sensitive for dirt, also the strength will
be less.
To avoid adhesive in/around the seam, make sure that the adhesive is dry (12-24h) before cold welding.
- Apply masking tape over the seam and press the tape properly with your hand or a roller. Use Werner Mueller tape item no. 50000 or an
equivalent. Make a trial seam or weld a smaller distance first in order to ensure that the tape works with the cold welding liquid.
- Cut the tape at the seam with a rotary cutter or an ordinary straight mat knife.
- Shake the tube of cold welding liquid and apply the liquid by pressing the needle deep down into the seam in order to ensure that the
liquid
penetrates down. Work with two hands by pressing the needle with one finger and squeezing the tube carefully with the other hand. Apply
so that
there is a 5-mm-wide layer of cold welding liquid on the tape.
- Remove the tape after approx. 10 minutes by pulling carefully backwards.
Miscellaneous
- If the material is being installed on steps, moldings must be used.
- Wheels on office chairs must be polyamide (hard type, designed for textile flooring).
- Furniture must have Teflon, polythene, stainless steel or similar feet.
- Certain types of rubber found in wheels of trolleys, entrance mats, etc. can cause discoloration in the form of migration. This type of
discoloration cannot be removed.
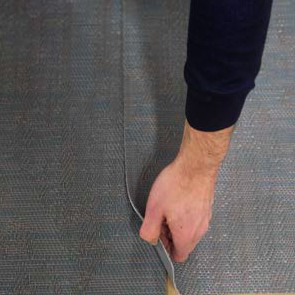
Figure 1
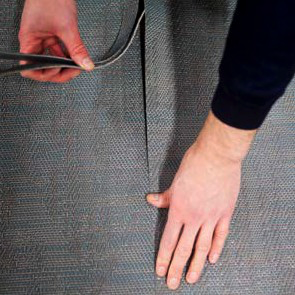
Figure 2
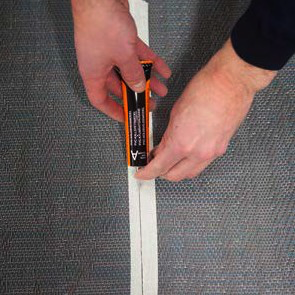
Figure 3
Installation Instructions For Tiles/Planks
The material
The material is a woven vinyl product backed with glass- fibre-reinforced vinyl.
Since the material is a woven product, its structure is naturally irregular.
The material is not approved for wet rooms.
Requirements
The sub-floor must be clean, dry and free from cracks. Any adhesion-impairing spots of paint, oil, etc. and any dust should be removed. Please
note that asphalt, spil- lages of oil, impregnating agents and felt pen markings can cause discoloration.
When installing on raised floor systems ensure that the panels are in level. Install the tiles randomly over the panels. Preferably use
tackifier.
Necessary damp-proofing must be in place to prevent harmful moisture coming into contact with the flooring. Follow national rules and
regulations with regard to moisture in floor structures. In the absence of such rules and regulations, use the following as guidelines.
When laying this product, the RH in any sub-floor of normal structural concrete must not exceed 85 %. This value only applies to construction
moisture. Measuring must always be performed by specially trained personnel.
Sub-floors of sheet material are assumed to contain an 8 % moisture ratio (which corresponds to 40 % RH at +20°C), so that no movement occurs
that may sub- sequently cause damage. In the event of any piping in floors, pipes must be laid so that the flooring material is not continuously
exposed to temperatures higher than 30°C, as otherwise discoloration and other changes to the material can occur. This also applies to areas
with underfloor heating.
Preparations
Carefully remove all dust and loose particles.
When using leveling compound, it is important to achieve the necessary strength and evenness.
Highly or unevenly absorbent sub-floors should be pre- glued with diluted floor adhesive (1:4). The pre-glued layer must be completely dry
before commencing laying. Installation on an existing plastic covering is not recom- mended. With painted sub–floors, there is a risk of disco-
loration. Existing paint must be removed.
Use pencil for any markings.
Before installation, material, adhesive and sub-floor must be allowed to adjust to room temperature, i.e. a temperature of at least +18°C. The
relative air humidity must be 30-60 %. Higher levels of air humidity result in longer drying times and a risk of blistering.
Installation
Make sure that the tiles have adjusted to room temperature before installation and that the boxes of tiles are on a level surface.
Acclimatization can take several days for complete pallets.
Installation should take place at a room temperature of at least +18°C. The relative air humidity in the premises must be 30-60%. Higher levels
of air humidity result in longer drying times and a risk of blistering.
Use adhesives designed for vinyl flooring.
Employ wet gluing for absorbent sub-floors. With sealed sub-floors (e.g. damp-proofed sub-floor), use late wet gluing to early sticky gluing.
Late sticky gluing will re- sult in a poorer glue joint and you also run the risk of the glued edges standing out from the surface of the
flooring. Normal consumption is around 4 m2/liter of adhesive for absorbent sub-floors and around 5 m2/liter for non-ab- sorbent sub-floors.
Installation time depends on various things, including type of sub-floor, absorption capacity of sub-floor, and temperature and air humidity in
the room. They can be handy to use if it is necessary to be able to lift the tiles, e.g. installation on raised floor systems.
For best results, the tiles should be turned one quarter turn to form a chequered pattern (see figure 1). It also works to lay the tiles in the
same direction. If this is the case, we recommend laying the tiles using a so-called bricklay, i.e. offset half a tile to the side (see figure
2). This gives a more uniform result than laying with a continuous joint, which is also possible (see figure 3). Since the material is a woven
fabric with natural variations in structure, slight differences in shade may be seen if the tiles are laid in the same direction. Take note of
the direction of the arrow on the reverse as per figures 1, 2 and 3.
Bolon tiles should be installed using traditional installation methods for flooring tiles.
- 1. It is usual to begin installation from the center of the room. In corridors and small rooms it may be simpler to work from one side
to the other and use the center line as a guide mark.
- 2. The center line can be drawn out as follows: Draw a line from the center between two of the walls. Then draw the second line to form
a cross with the other line. To achieve a right angle, the 3:4:5 method can be used.
- 3. Begin laying tiles at the center point. Work outwards from the first tile, creating a pyramid. Continue in this way until the first
quarter of the floor is complete. Be careful to follow the guidelines and ensure that the tiles fit closely together. If the first tiles
do not follow the guidelines, this will affect the whole process. Only spread adhesive over an area of a size that can be covered with
tiles while the adhesive retains the right consistency.
- 4. As it takes time to cut edge tiles, it may be best to spread adhesive on the area where complete tiles will be laid first. Once this
is done, cut all edge tiles and lay them at the same time.
- 5. After installation, run a joint roller over all joints length- ways and crossways with a minimum pressure of 75 kg.
Miscellaneous
- If the material is being installed on steps, moldings must be used.
- Wheels on office chairs must be polyamide (hard type, designed for textile flooring).
- Furniture must have feet of teflon, polythene, stain- less steel or similar.
- Some types of rubber found in wheels of trolleys, entrance mats, etc. can cause discoloration in the form of migration. This type of
discoloration cannot be removed.
Download Installation Instructions >>